SpringBoot Zero 笔记
天生我材必有用,千金散尽还复来。
SpringBoot笔记
Tomcat配置SLL证书
-
申请证书并下载

-
将.pfx文件复制到resources下

-
配置application.yml
spring:
  application:
    name: pika
server:
  port: 443
  ssl:
    key-store: classpath:8604835_host.pikachuvirtual.top.pfx
    key-store-password: Qni83X9e
    key-store-type: PKCS12
    ciphers: TLS_RSA_WITH_AES_128_CBC_SHA,TLS_RSA_WITH_AES_256_CBC_SHA,TLS_ECDHE_RSA_WITH_AES_128_CBC_SHA,TLS_ECDHE_RSA_WITH_AES_128_CBC_SHA256,TLS_RSA_WITH_AES_128_CBC_SHA256,TLS_RSA_WITH_AES_256_CBC_SHA256
https 访问有锁:

http 访问显示不安全:

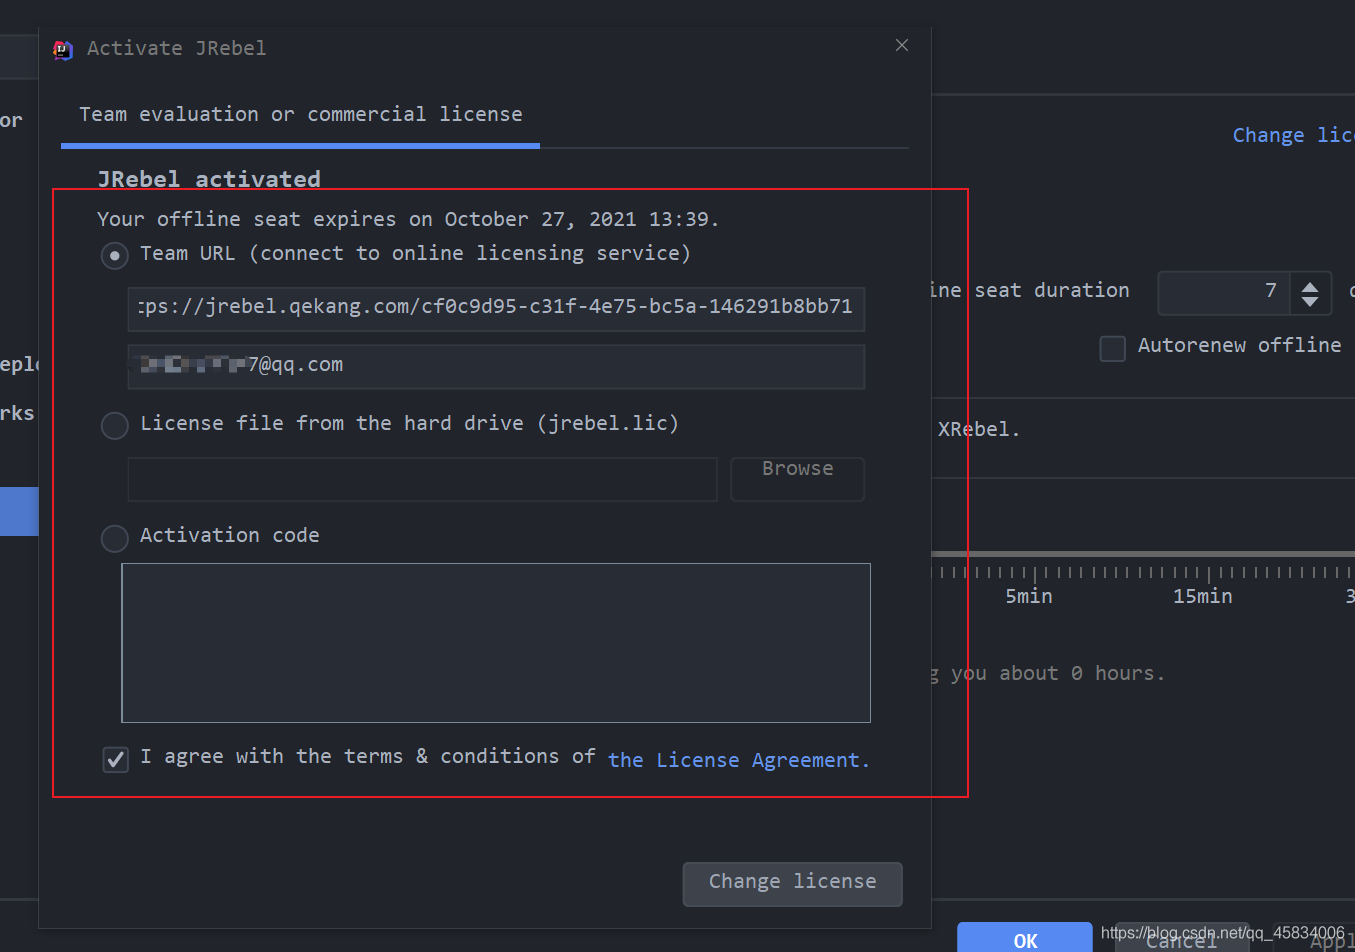
热部署开发插件Jrebel

注解
@Autowired 与@Resource的区别(详细)
不但支持自己定义的@Autowired注解,还支持几个由JSR-250规范定义的注解,它们分别是@Resource、@PostConstruct以及@PreDestroy。
@Resource / @Autuwired
修饰符 	Class 	字段名;
缺省	         type      name
@Resource的作用相当于@Autowired,
-
@Autowired 默认按byType自动注入,若存在多个实例,则进一步从多个Bean实例中通过字段名注入。
-
@Resource有两个属性是比较重要的,分是name和type,Spring将@Resource注解的name属性解析为bean的名字,而type属性则解析为bean的类型。所以如果使用name属性,则使用byName的自动注入策略,而使用type属性时则使用byType自动注入策略。如果既不指定name也不指定type属性,这时将通过反射机制使用byName自动注入策略。
@Resource装配顺序
-
如果同时指定了name和type,则从Spring上下文中找到唯一匹配的bean进行装配,找不到则抛出异常 2. 如果指定了name,则从上下文中查找名称(id)匹配的bean进行装配,找不到则抛出异常 3. 如果指定了type,则从上下文中找到类型匹配的唯一bean进行装配,找不到或者找到多个,都会抛出异常 4. 如果既没有指定name,又没有指定type,则自动按照byName方式进行装配;如果没有匹配,则回退为一个原始类型进行匹配,如果匹配则自动装配;
@Autowired 与@Resource的区别:
1、 @Autowired与@Resource都可以用来装配bean. 都可以写在字段上,或写在setter方法上。
2、 @Autowired默认按类型装配(这个注解是属于Spring的),默认情况下必须要求依赖对象必须存在,如果要允许null值,可以设置它的required属性为false,如:@Autowired(required=false) ,如果我们想使用名称装配可以结合@Qualifier注解进行使用,如下:
@Autowired () @Qualifier ( "baseDao" )
private BaseDao baseDao;
3、@Resource(这个注解属于J2EE的),默认按照名称进行装配,名称可以通过name属性进行指定,如果没有指定name属性,当注解写在字段上时,默认取字段名进行安装名称查找,如果注解写在setter方法上默认取属性名进行装配。当找不到与名称匹配的bean时才按照类型进行装配。但是需要注意的是,如果name属性一旦指定,就只会按照名称进行装配。
@Resource (name= "baseDao" )
private BaseDao baseDao;
推荐使用:@Resource注解在字段上,这样就不用写setter方法了,并且这个注解是属于J2EE的,减少了与spring的耦合。这样代码看起就比较优雅。
@Autowired是根据类型进行自动装配的。如果当Spring上下文中存在不止一个UserDao类型的bean时,就会抛出BeanCreationException异常;如果Spring上下文中不存在UserDao类型的bean,也会抛出BeanCreationException异常。我们可以使用@Qualifier配合@Autowired来解决这些问题。如下:
①可能存在多个UserDao实例
@Autowired
@Qualifier("userServiceImpl")
public IUserService userService;
@Autowired
public void setUserDao(@Qualifier("userDao") UserDao userDao) {
    this.userDao = userDao;
}
这样Spring会找到id为userServiceImpl和userDao的bean进行装配。
②可能不存在UserDao实例
@Autowired(required = false)
public IUserService userService
个人总结:
@Autowired//默认按type注入 @Qualifier(“cusInfoService”)//一般作为@Autowired()的修饰用 @Resource(name=”cusInfoService”)//默认按name注入,可以通过name和type属性进行选择性注入
一般@Autowired和@Qualifier一起用,@Resource单独用。
当然没有冲突的话@Autowired也可以单独用
常用注解
–定义Bean的注解
@Controller("Bean的名称")

定义控制层Bean,如Action


@Service("Bean的名称")

定义业务层Bean

@Repository("Bean的名称")

定义DAO层Bean

@Component

定义Bean, 不好归类时使用.
–自动装配Bean (选用一种注解就可以)
@Autowired (Srping提供的)
默认按类型匹配,自动装配(Srping提供的),可以写在成员属性上,或写在setter方法上
@Autowired(required=true)
一定要找到匹配的Bean,否则抛异常。 默认值就是true
@Autowired
@Qualifier(“bean的名字”)
按名称装配Bean,与@Autowired组合使用,解决按类型匹配找到多个Bean问题。
@Resource JSR-250提供的
默认按名称装配,当找不到名称匹配的bean再按类型装配.
可以写在成员属性上,或写在setter方法上
可以通过@Resource(name=”beanName”) 指定被注入的bean的名称, 要是未指定name属性, 默认使用成员属性的变量名,一般不用写name属性.
@Resource(name=”beanName”)指定了name属性,按名称注入但没找到bean, 就不会再按类型装配了.
@Inject 是JSR-330提供的
按类型装配,功能比@Autowired少,没有使用的必要。
–定义Bean的作用域和生命过程
@Scope(“prototype”)
值有:singleton,prototype,session,request,session,globalSession
@PostConstruct
相当于init-method,使用在方法上,当Bean初始化时执行。
@PreDestroy
相当于destory-method,使用在方法上,当Bean销毁时执行。
–声明式事务
@Transactional
@Autowired @Resource @Qualifier的区别
实用理解:@Autowired @Resource 二选其一,看中哪个就用哪个。
简单理解:
@Autowired 根据类型注入,
@Resource 默认根据名字注入,其次按照类型搜索
@Autowired @Qualifie(“userService”) 两个结合起来可以根据名字和类型注入
复杂理解:
比如你有这么一个Bean
@Service(“UserService”)
public Class UserServiceImpl implements UserService{};
现在你想在UserController 里面使用这个UserServiceImpl
public Class UserController {

@AutoWire
//当使用这个注入的时候上面的 UserServiceImpl 只需要这样写 @Service,这样就会自动找到UserService这个类型以及他的子类型。UserServiceImpl 实现了UserService,所以能够找到它。不过这样有一个缺点,就是当UserService实现类有两个以上的时候,这个时候会找哪一个呢,这就造成了冲突,所以要用@AutoWire注入的时候要确保UserService只有一个实现类。

//@Resource 默认情况下是按照名称进行匹配,如果没有找到相同名称的Bean,则会按照类型进行匹配,有人可能会想了,这下好了,用这个是万能的了,不用管名字了,也不用管类型了,但这里还是有缺点。首先,根据这个注解的匹配效果可以看出,它进行了两次匹配,也就是说,如果你在UserService这个类上面这样写注解,@Service,它会怎么找呢,首先是找相同名字的,如果没有找到,再找相同类型的,而这里的@Service没有写名字,这个时候就进行了两次搜索,显然,速度就下降了许多。也许你还会问,这里的@Service本来就没有名字,肯定是直接进行类型搜索啊。其实不是这样的,UserServiceImpl 上面如果有@Service默认的名字 是这个userServiceImpl,注意看,就是把类名前面的大写变成小写,就是默认的Bean的名字了。 @Resource根据名字搜索是这样写@Resource("userService"),如果你写了这个名字叫userService,那么UserServiceImpl上面必须也是这个名字,不然还是会报错。


//@Autowired @Qualifie("userService") 是直接按照名字进行搜索,也就是说,对于UserServiceImpl 上面@Service注解必须写名字,不写就会报错,而且名字必须是@Autowired @Qualifie("userService") 保持一致。如果@Service上面写了名字,而@Autowired @Qualifie() ,一样会报错。


private UserService userService;

}
说了这么多,可能你有些说晕了,那么怎么用这三个呢,要实际的工作是根据实际情况来使用的,通常使用AutoWire和@Resource多一些,bean的名字不用写,而UserServiceImpl上面能会这样写 @Service(“userService”)。这里的实际工作情况,到底是什么情况呢?说白了就是整个项目设计时候考虑的情况,如果你的架构设计师考虑的比较精细,要求比较严格,要求项目上线后的访问速度比较好,通常是考虑速度了。这个时候@AutoWire没有@Resource好用,因为@Resource可以根据名字来搜索,是这样写的@Resource(“userService”)。这个@Autowired @Qualifie(“userService”) 也可以用名字啊,为什么不用呢,原因很简单,这个有点长,不喜欢,增加工作量。因为根据名字搜索是最快的,就好像查数据库一样,根据Id查找最快。因为这里的名字与数据库里面的ID是一样的作用。这个时候,就要求你多写几个名字,工作量自然就增加了。而如果你不用注解,用xml文件的时候,对于注入Bean的时候要求写一个Id,xml文件时候的id就相当于这里的名字。
说了那么多没用,你能做的就是简单直接,什么最方便就用什么,
你就直接用@Resource得了,如果你喜欢用@AutoWire也行,不用写名字。
通常情况一个Bean的注解写错了,会报下面这些错误,最为常见,
No bean named ‘user’ is defined,这个表示没有找到被命名为user的Bean,通俗的说,就是名字为user的类型,以及它的子类型,出现这个错误的原因就是注入时候的类型名字为user,而搜索的时候找不到,也就是说可能那个搜索的类型,并没有命令为user,解决办法就是找到这个类型,去命令为user,
下面这个错误也常见,
No qualifying bean of type [com.service.UserService] found for dependency:
这个错误的原因就是类型上面没有加@Service这个注入,不仅仅是@Service,如果是其他层也会出现这个错误,这里我是以Service为例子说明,如果是DAO层就是没有加@Repository,Controller层,则是没有加@Controller。
还有,如果你还是想再简单点,无论是DAO,Controller,Service三个层,都可以用这个注解,@Component,这个注解通用所有的Bean,这个时候你可能会说了,有通常的为什么用的人少呢,那是因为MVC这个分层的设计原则,用@Repository,@Service,@Controller,这个可以区别MVC原则中的DAO,Service,Controller。便于识别。
博客2:
spring autowired qualifier bytype byname
在使用Spring框架中@Autowired标签时默认情况下使用
Java代码
@Autowired
注释进行自动注入时,Spring 容器中匹配的候选 Bean 数目必须有且仅有一个。当找不到一个匹配的 Bean 时,Spring 容器将抛出 BeanCreationException 异常,并指出必须至少拥有一个匹配的 Bean。
@Autowired 默认是按照byType进行注入的,如果发现找到多个bean,则,又按照byName方式比对,如果还有多个,则报出异常。
例子:
@Autowired private ExamUserMapper examUserMapper; - ExamUserMapper是一个接口
-
spring先找类型为ExamUserMapper的bean
-
如果存在且唯一,则OK;
-
如果不唯一,在结果集里,寻找name为examUserMapper的bean。因为bean的name有唯一性,所以,到这里应该能确定是否存在满足要求的bean了
@Autowired也可以手动指定按照byName方式注入,使用@Qualifier标签,例如:
@Autowired` `() ` `@Qualifier` `(` `"baseDao"` `)
Spring 允许我们通过
@Qualifier
注释指定注入 Bean 的名称,这样歧义就消除了,可以通过下面的方法解决异常。
@Qualifier("XXX")
中的 XX是 Bean 的名称,所以 @Autowired 和 @Qualifier 结合使用时,自动注入的策略就从 byType 转变成 byName 了。
@Autowired 可以对成员变量、方法以及构造函数进行注释,而 @Qualifier 的标注对象是成员变量、方法入参、构造函数入参。
Spring不但支持自己定义的@Autowired注解,还支持几个由JSR-250规范定义的注解,它们分别是@Resource、@PostConstruct以及@PreDestroy。
@Resource
的作用相当于@Autowired,只不过@Autowired按byType自动注入,而@Resource默认按 byName自动注入罢了。@Resource有两个属性是比较重要的,分是name和type,Spring将@Resource注解的name属性解析为bean的名字,而type属性则解析为bean的类型。所以如果使用name属性,则使用byName的自动注入策略,而使用type属性时则使用byType自动注入策略。如果既不指定name也不指定type属性,这时将通过反射机制使用byName自动注入策略。
@Resource装配顺序 1. 如果同时指定了name和type,则从Spring上下文中找到唯一匹配的bean进行装配,找不到则抛出异常 2. 如果指定了name,则从上下文中查找名称(id)匹配的bean进行装配,找不到则抛出异常 3. 如果指定了type,则从上下文中找到类型匹配的唯一bean进行装配,找不到或者找到多个,都会抛出异常 4. 如果既没有指定name,又没有指定type,则自动按照byName方式进行装配;如果没有匹配,则回退为一个原始类型进行匹配,如果匹配则自动装配
Spring @Order注解的使用
注解@Order或者接口Ordered的作用是定义Spring IOC容器中Bean的执行顺序的优先级,而不是定义Bean的加载顺序,Bean的加载顺序不受@Order或Ordered接口的影响;
@Order的注解源码解读
@Retention(RetentionPolicy.RUNTIME)
@Target({ElementType.TYPE, ElementType.METHOD, ElementType.FIELD})
@Documented
public @interface Order {

	/**
	 * 默认是最低优先级,值越小优先级越高
	 */
	int value() default Ordered.LOWEST_PRECEDENCE;

}
- 注解可以作用在类(接口、枚举)、方法、字段声明(包括枚举常量);
- 注解有一个int类型的参数,可以不传,默认是最低优先级;
- 通过常量类的值我们可以推测参数值越小优先级越高;
Ordered接口类
package org.springframework.core;

public interface Ordered {
    int HIGHEST_PRECEDENCE = -2147483648;
    int LOWEST_PRECEDENCE = 2147483647;

    int getOrder();
}
创建BlackPersion、YellowPersion类,这两个类都实现CommandLineRunner
实现CommandLineRunner接口的类会在Spring IOC容器加载完毕后执行,适合预加载类及其它资源;也可以使用ApplicationRunner,使用方法及效果是一样的
package com.yaomy.common.order;

import org.springframework.boot.CommandLineRunner;
import org.springframework.core.annotation.Order;
import org.springframework.stereotype.Component;

/**
 * @Description: Description
 * @ProjectName: spring-parent
 * @Version: 1.0
 */
@Component
@Order(1)
public class BlackPersion implements CommandLineRunner {
    @Override
    public void run(String... args) throws Exception {
        System.out.println("----BlackPersion----");
    }
}
package com.yaomy.common.order;

import org.springframework.boot.CommandLineRunner;
import org.springframework.core.annotation.Order;
import org.springframework.stereotype.Component;

/**
 * @Description: Description
 * @ProjectName: spring-parent
 * @Version: 1.0
 */
@Component
@Order(0)
public class YellowPersion implements CommandLineRunner {
    @Override
    public void run(String... args) throws Exception {
        System.out.println("----YellowPersion----");
    }
}
启动应用程序打印出结果
----YellowPersion----
----BlackPersion----
我们可以通过调整@Order的值来调整类执行顺序的优先级,即执行的先后;当然也可以将@Order注解更换为Ordered接口,效果是一样的
到这里可能会疑惑IOC容器是如何根据优先级值来先后执行程序的,那接下来看容器是如何加载component的
- 看如下的启动main方法
@SpringBootApplication
public class CommonBootStrap {
    public static void main(String[] args) {
        SpringApplication.run(CommonBootStrap.class, args);
    }
}
    public ConfigurableApplicationContext run(String... args) {
        StopWatch stopWatch = new StopWatch();
        stopWatch.start();
        ConfigurableApplicationContext context = null;
        Collection<SpringBootExceptionReporter> exceptionReporters = new ArrayList();
        this.configureHeadlessProperty();
        SpringApplicationRunListeners listeners = this.getRunListeners(args);
        listeners.starting();

        Collection exceptionReporters;
        try {
            ApplicationArguments applicationArguments = new DefaultApplicationArguments(args);
            ConfigurableEnvironment environment = this.prepareEnvironment(listeners, applicationArguments);
            this.configureIgnoreBeanInfo(environment);
            Banner printedBanner = this.printBanner(environment);
            context = this.createApplicationContext();
            exceptionReporters = this.getSpringFactoriesInstances(SpringBootExceptionReporter.class, new Class[]{ConfigurableApplicationContext.class}, context);
            this.prepareContext(context, environment, listeners, applicationArguments, printedBanner);
            this.refreshContext(context);
            this.afterRefresh(context, applicationArguments);
            stopWatch.stop();
            if (this.logStartupInfo) {
                (new StartupInfoLogger(this.mainApplicationClass)).logStarted(this.getApplicationLog(), stopWatch);
            }

            listeners.started(context);
            //这里是重点,调用具体的执行方法
            this.callRunners(context, applicationArguments);
        } catch (Throwable var10) {
            this.handleRunFailure(context, var10, exceptionReporters, listeners);
            throw new IllegalStateException(var10);
        }

        try {
            listeners.running(context);
            return context;
        } catch (Throwable var9) {
            this.handleRunFailure(context, var9, exceptionReporters, (SpringApplicationRunListeners)null);
            throw new IllegalStateException(var9);
        }
    }
   private void callRunners(ApplicationContext context, ApplicationArguments args) {
        List<Object> runners = new ArrayList();
        runners.addAll(context.getBeansOfType(ApplicationRunner.class).values());
        runners.addAll(context.getBeansOfType(CommandLineRunner.class).values());
        //重点来了,按照定义的优先级顺序排序
        AnnotationAwareOrderComparator.sort(runners);
        Iterator var4 = (new LinkedHashSet(runners)).iterator();
        //循环调用具体方法
        while(var4.hasNext()) {
            Object runner = var4.next();
            if (runner instanceof ApplicationRunner) {
                this.callRunner((ApplicationRunner)runner, args);
            }

            if (runner instanceof CommandLineRunner) {
                this.callRunner((CommandLineRunner)runner, args);
            }
        }

    }

    private void callRunner(ApplicationRunner runner, ApplicationArguments args) {
        try {
            //执行方法
            runner.run(args);
        } catch (Exception var4) {
            throw new IllegalStateException("Failed to execute ApplicationRunner", var4);
        }
    }

    private void callRunner(CommandLineRunner runner, ApplicationArguments args) {
        try {
            //执行方法
            runner.run(args.getSourceArgs());
        } catch (Exception var4) {
            throw new IllegalStateException("Failed to execute CommandLineRunner", var4);
        }
    }
到这里优先级类的示例及其执行原理都分析完毕;不过还是要强调下@Order、Ordered不影响类的加载顺序而是影响Bean加载如IOC容器之后执行的顺序(优先级);
个人理解是加载代码的底层要支持优先级执行程序,否则即使配置上Ordered、@Order也是不起任何作用的
@Lazy
Spring IoC (ApplicationContext) 容器一般都会在启动的时候实例化所有单实例 bean 。如果我们想要 Spring 在启动的时候延迟加载 bean,即在调用某个 bean 的时候再去初始化,那么就可以使用 @Lazy 注解。
@Lazy 的属性
value 取值有 true 和 false 两个 默认值为 true
true 表示使用 延迟加载, false 表示不使用,false 纯属多余,如果不使用,不标注该注解就可以了。 Person 类
public class Person {
    private String name;
    private Integer age;

    public Person() {
    }

    public Person(String name, Integer age) {
        System.out.println(" 对象被创建了.............");
        this.name = name;
        this.age = age;
    }

  // 省略 getter setter 和 toString 方法
}
配置类 不标注 @Lazy 注解
public class LazyConfig {
    @Bean
    public Person person() {
        return new Person("李四", 55);
    }
}
测试
    @Test
    public void test5() {
        ApplicationContext ctx = new AnnotationConfigApplicationContext(LazyConfig.class);
    }
不获取 bean , 看控制台是否会打印。如果有打印,代表调用了构造器。
结果
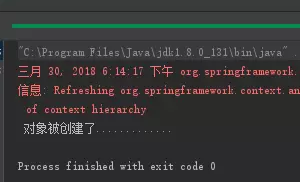
在配置类打上 @Lazy 注解
public class LazyConfig {
    @Lazy
    @Bean
    public Person person() {
        return new Person("李四", 55);
    }
}
再来看输出结果
 T
T
没有打印语句,对象没有调用构造器,那么方法也就没有被创建。 @Lazy(value = false) 或者 @Lazy(false) 那么对象会在初始化的时候被创建
@Lazy注解注解的作用主要是减少springIOC容器启动的加载时间
当出现循环依赖时,也可以添加@Lazy
@PostConstruct
执行时机: 构造方法执行完成,属性注入完成后,该方法不应带有参数
@Conditional条件装配
条件注解是Spring4提供的一种bean加载特性,主要用于控制配置类和bean初始化条件。在springBoot,springCloud一系列框架底层源码中,条件注解的使用到处可见。
不少人在使用 @ConditionalOnBean 注解时会遇到不生效的情况,依赖的 bean 明明已经配置了,但就是不生效。是不是@ConditionalOnBean和 Bean加载的顺序有没有关系呢?
问题演示:
@Configuration
public class Configuration1 {

    @Bean
    @ConditionalOnBean(Bean2.class)
    public Bean1 bean1() {
        return new Bean1();
    }
}
@Configuration
public class Configuration2 {

    @Bean
    public Bean2 bean2(){
        return new Bean2();
    }
}
运行结果: @ConditionalOnBean(Bean2.class)返回false。明明定义的有bean2,bean1却未加载。
源码分析
首先要明确一点,条件注解的解析一定发生在spring ioc的bean definition阶段,因为 spring bean初始化的前提条件就是有对应的bean definition,条件注解正是通过判断bean definition来控制bean能否被解析。
对上述示例进行源码调试。
从 bean definition解析的入口开始:ConfigurationClassPostProcessor
    @Override
    public void postProcessBeanDefinitionRegistry(BeanDefinitionRegistry registry) {
        int registryId = System.identityHashCode(registry);
        if (this.registriesPostProcessed.contains(registryId)) {
            throw new IllegalStateException(
                    "postProcessBeanDefinitionRegistry already called on this post-processor against " + registry);
        }
        if (this.factoriesPostProcessed.contains(registryId)) {
            throw new IllegalStateException(
                    "postProcessBeanFactory already called on this post-processor against " + registry);
        }
        this.registriesPostProcessed.add(registryId);

        // 解析bean definition入口
        processConfigBeanDefinitions(registry);
    }
跟进processConfigBeanDefinitions方法:
public void processConfigBeanDefinitions(BeanDefinitionRegistry registry) {

            //省略不必要的代码...
            //解析候选bean,先获取所有的配置类,也就是@Configuration标注的类
            parser.parse(candidates);
            parser.validate();

            //配置类存入集合
            Set<ConfigurationClass> configClasses = new LinkedHashSet<>(parser.getConfigurationClasses());
            configClasses.removeAll(alreadyParsed);

            // Read the model and create bean definitions based on its content
            if (this.reader == null) {
                this.reader = new ConfigurationClassBeanDefinitionReader(
                        registry, this.sourceExtractor, this.resourceLoader, this.environment,
                        this.importBeanNameGenerator, parser.getImportRegistry());
            }
            //开始解析配置类,也就是条件注解解析的入口
            this.reader.loadBeanDefinitions(configClasses);
            alreadyParsed.addAll(configClasses);
            //...

}
跟进条件注解解析入口loadBeanDefinitions,开始循环解析所有的配置类。这里是所有自定义的配置类和自动装配的配置类,如下:
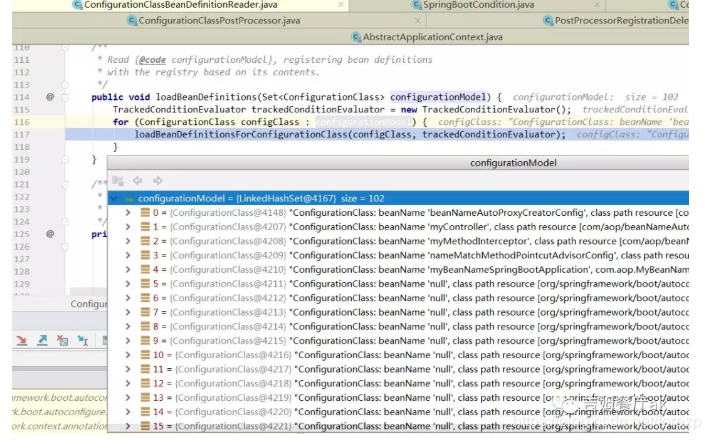
上述代码开始解析配置类。如果配置类中有@Bean标注的方法,则会调用loadBeanDefinitionsForBeanMethod()来获得所有方法。然后循环解析,解析时会执行如下校验方法,也正是条件注解的入口:
public boolean shouldSkip(@Nullable AnnotatedTypeMetadata metadata, @Nullable ConfigurationPhase phase) {


        //判断是否有条件注解,否则直接返回
        if (metadata == null || !metadata.isAnnotated(Conditional.class.getName())) {
            return false;
        }

        if (phase == null) {
            if (metadata instanceof AnnotationMetadata &&
                    ConfigurationClassUtils.isConfigurationCandidate((AnnotationMetadata) metadata)) {
                return shouldSkip(metadata, ConfigurationPhase.PARSE_CONFIGURATION);
            }
            return shouldSkip(metadata, ConfigurationPhase.REGISTER_BEAN);
        }

        //获取当前定义bean的方法上,所有的条件注解
        List<Condition> conditions = new ArrayList<>();
        for (String[] conditionClasses : getConditionClasses(metadata)) {
            for (String conditionClass : conditionClasses) {
                Condition condition = getCondition(conditionClass, this.context.getClassLoader());
                conditions.add(condition);
            }
        }

        //根据Order来进行排序
        AnnotationAwareOrderComparator.sort(conditions);

        //遍历条件注解,开始执行条件注解的流程
        for (Condition condition : conditions) {
            ConfigurationPhase requiredPhase = null;
            if (condition instanceof ConfigurationCondition) {
                requiredPhase = ((ConfigurationCondition) condition).getConfigurationPhase();
            }
            //这里执行条件注解的 condition.matches 方法来进行匹配,返回布尔值
            if ((requiredPhase == null || requiredPhase == phase) && !condition.matches(this.context, metadata)) {
                return true;
            }
        }

        return false;
    }
继续跟进条件注解的匹配方法,开始解析示例代码中bean1的配置:
   @Bean
    @ConditionalOnBean(Bean2.class)
    public Bean1 bean1() {
        return new Bean1();
    }
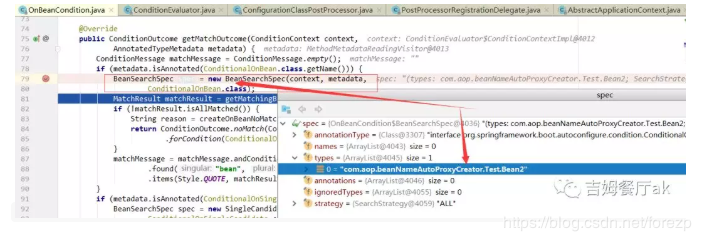
在getMatchOutcome方法中,参数metadata是要解析的目标bean,也就是bean1。条件注解依赖的bean被封装成了BeanSearchSpec,从名字可以看出是要寻找的对象,这是一个静态内部类,构造方法如下:
BeanSearchSpec(ConditionContext context, AnnotatedTypeMetadata metadata,
                Class<?> annotationType) {
            this.annotationType = annotationType;
            //读取 metadata中的设置的value
            MultiValueMap<String, Object> attributes = metadata
                    .getAllAnnotationAttributes(annotationType.getName(), true);
            //设置各参数,根据这些参数进行寻找目标类
            collect(attributes, "name", this.names);
            collect(attributes, "value", this.types);
            collect(attributes, "type", this.types);
            collect(attributes, "annotation", this.annotations);
            collect(attributes, "ignored", this.ignoredTypes);
            collect(attributes, "ignoredType", this.ignoredTypes);
            this.strategy = (SearchStrategy) metadata
                    .getAnnotationAttributes(annotationType.getName()).get("search");
            BeanTypeDeductionException deductionException = null;
            try {
                if (this.types.isEmpty() && this.names.isEmpty()) {
                    addDeducedBeanType(context, metadata, this.types);
                }
            }
            catch (BeanTypeDeductionException ex) {
                deductionException = ex;
            }
            validate(deductionException);
        }
继续跟进搜索bean的方法:
MatchResult matchResult = getMatchingBeans(context, spec);
private MatchResult getMatchingBeans(ConditionContext context, BeanSearchSpec beans) {
        ConfigurableListableBeanFactory beanFactory = context.getBeanFactory();
        if (beans.getStrategy() == SearchStrategy.ANCESTORS) {
            BeanFactory parent = beanFactory.getParentBeanFactory();
            Assert.isInstanceOf(ConfigurableListableBeanFactory.class, parent,
                    "Unable to use SearchStrategy.PARENTS");
            beanFactory = (ConfigurableListableBeanFactory) parent;
        }
        MatchResult matchResult = new MatchResult();
        boolean considerHierarchy = beans.getStrategy() != SearchStrategy.CURRENT;
        List<String> beansIgnoredByType = getNamesOfBeansIgnoredByType(
                beans.getIgnoredTypes(), beanFactory, context, considerHierarchy);
        //因为实例代码中设置的是类型,所以这里会遍历类型,根据type获取目标bean是否存在
        for (String type : beans.getTypes()) {
            Collection<String> typeMatches = getBeanNamesForType(beanFactory, type,
                    context.getClassLoader(), considerHierarchy);
            typeMatches.removeAll(beansIgnoredByType);
            if (typeMatches.isEmpty()) {
                matchResult.recordUnmatchedType(type);
            }
            else {
                matchResult.recordMatchedType(type, typeMatches);
            }
        }
        //根据注解寻找
        for (String annotation : beans.getAnnotations()) {
            List<String> annotationMatches = Arrays
                    .asList(getBeanNamesForAnnotation(beanFactory, annotation,
                            context.getClassLoader(), considerHierarchy));
            annotationMatches.removeAll(beansIgnoredByType);
            if (annotationMatches.isEmpty()) {
                matchResult.recordUnmatchedAnnotation(annotation);
            }
            else {
                matchResult.recordMatchedAnnotation(annotation, annotationMatches);
            }
        }
        //根据设置的name进行寻找
        for (String beanName : beans.getNames()) {
            if (!beansIgnoredByType.contains(beanName)
                    && containsBean(beanFactory, beanName, considerHierarchy)) {
                matchResult.recordMatchedName(beanName);
            }
            else {
                matchResult.recordUnmatchedName(beanName);
            }
        }
        return matchResult;
    }
getBeanNamesForType()方法最终会委托给BeanTypeRegistry类的getNamesForType方法来获取对应的指定类型的bean name:
    Set<String> getNamesForType(Class<?> type) {
        //同步spring容器中的bean
        updateTypesIfNecessary();
        //返回指定类型的bean
        return this.beanTypes.entrySet().stream()
                .filter((entry) -> entry.getValue() != null
                        && type.isAssignableFrom(entry.getValue()))
                .map(Map.Entry::getKey)
                .collect(Collectors.toCollection(LinkedHashSet::new));
    }
重点来了。 上述方法中的第一步便是同步bean,也就是获取此时 spring 容器中的所有 beanDifinition。只有这样,条件注解的判断才有意义。
我们跟进updateTypesIfNecessary():
    private void updateTypesIfNecessary() {
        //这里lastBeanDefinitionCount 代表已经同步的数量,如果和容器中的数量不相等,才开始同步。
        //否则,获取beanFactory迭代器,开始同步。
        if (this.lastBeanDefinitionCount != this.beanFactory.getBeanDefinitionCount()) {
            Iterator<String> names = this.beanFactory.getBeanNamesIterator();
            while (names.hasNext()) {
                String name = names.next();
                if (!this.beanTypes.containsKey(name)) {
                    addBeanType(name);
                }
            }
            //同步完之后,更新已同步的beanDefinition数量。
            this.lastBeanDefinitionCount = this.beanFactory.getBeanDefinitionCount();
        }
    }
离答案只差一步了,就是看一下从beanFactory中迭代的是哪些beanDefinition?
继续跟进getBeanNamesIterator():
@Override
    public Iterator<String> getBeanNamesIterator() {
        CompositeIterator<String> iterator = new CompositeIterator<>();
        iterator.add(this.beanDefinitionNames.iterator());
        iterator.add(this.manualSingletonNames.iterator());
        return iterator;
    }
分别来看:
-
beanDefinitionNames就是存储一些自动解析和装配的bean,我们的启动类、配置类、controller、service等。 -
manualSingletonNames,从名字可以看出,手工单例名称。什么意思呢?在spring ioc的过程中,会手动触发一些bean的注册。比如在springboot启动过程中,会显示的注册一些配置 bean,如:springBootBanner,systemEnvironment,systemProperties等。
我们来分析一下上面示例bean1为何没有实例化?
在spring ioc的过程中,优先解析@Component,@Service,@Controller注解的类。其次解析配置类,也就是@Configuration标注的类。最后开始解析配置类中定义的bean。
示例代码中bean1是定义在配置类中的,当执行到配置类解析的时候,@Component,@Service,@Controller ,@Configuration标注的类已经全部扫描,所以这些BeanDifinition已经被同步。 但是bean1的条件注解依赖的是bean2,bean2是被定义的配置类中的,所以此时配置类的解析无法保证先后顺序,就会出现不生效的情况。
同样的道理,如果依赖的是FeignClient,可以设想一下结果?FeignClient最终还是由配置类触发的,解析的先后顺序同样也不能保证。
解决
以下两种方式:
- 项目中条件注解依赖的类,大多会交给
spring容器管理,所以如果要在配置中Bean通过@ConditionalOnBean依赖配置中的Bean时,完全可以用@ConditionalOnClass(Bean2.class)来代替。 - 如果一定要区分两个配置类的先后顺序,可以将这两个类交与
EnableAutoConfiguration管理和触发。也就是定义在META-INF\spring.factories中声明是配置类,然后通过@AutoConfigureBefore、AutoConfigureAfter AutoConfigureOrder控制先后顺序。之所以这么做是因为这三个注解只对自动配置类的先后顺序生效。 这里推荐第一种。
总结
在配置类中定义Bean,如果使用@ConditionalOnBean注解依赖的Bean是通过配置类触发解析的,则执行结果依赖配置类加载顺序
问题
‘java.lang.String’ that could not be found.
Description:
Parameter 0 of method secKill in com.pika.config.SecKillController required a bean of type ‘java.lang.String’ that could not be found.
因为注释的时候没有把@Autowired一同注释掉,有一个空的@Autowired引起报错,导致项目启动报错。
Jackson冲突
Error creating bean with name ‘requestMappingHandlerAdapter’ defined in class path resource [org/springframework/boot/autoconfigure/web/servlet/WebMvcAutoConfiguration$EnableWebMvcConfiguration.class]: Bean instantiation via factory method failed; nested exception is org.springframework.beans
Caused by: org.springframework.beans.BeanInstantiationException: Failed to instantiate [com.fasterxml.jackson.datatype.jsr310.JavaTimeModule]: Unresolvable class definition; nested exception is java.lang.NoClassDefFoundError: com/fasterxml/jackson/databind/ser/std/ToStringSerializerBase
	at org.springframework.beans.BeanUtils.instantiateClass(BeanUtils.java:157)

Caused by: java.lang.ClassNotFoundException: com.fasterxml.jackson.databind.ser.std.ToStringSerializerBase

	... 73 more
大概有以下几点:
- 有的说是
jackson jar包版本低了 把版本修改了就行了 - 还有可能是
jar 包冲突了解决冲突也能行 - 还有可能是 兼容问题哈
<!--json-->
<dependency>
    <groupId>com.alibaba</groupId>
    <artifactId>fastjson</artifactId>
    <version>1.2.33</version>
</dependency>
<dependency>
    <groupId>com.fasterxml.jackson.core</groupId>
    <artifactId>jackson-databind</artifactId>
    <version>2.9.0</version>
</dependency>
1234567891011
可以先都试一试哈,没有给大家找完全哈。
解决
最后我找到的解决方式 就是因为这句话 使Jackson支持JSR310标准
然后最后导入了下面这个依赖:
<dependency>
    <groupId>com.fasterxml.jackson.datatype</groupId>
    <artifactId>jackson-datatype-jsr310</artifactId>
    <version>2.9.2</version>
</dependency>
Interceptor拦截器配置失效问题
1、拦截器类没加@Component或者注册拦截器类没加@Configuration注解
2、@ComponentScan没扫描到
3、检查拦截路径是否配置准确
4、配置类错误
如果同时配置一个类继承WebMvcConfigurationSupport和一个类实现 WebMvcConfigurer或者WebMvcConfigurerAdapter,就会导致只有一个生效。
解决办法:
- 将这些配置都在一个类中设置
- 继承生效的配置类,重写 addInterceptors 方法,并将该实现类放入容器中
版权声明:如无特别声明,本站收集的文章归 HuaJi66/Others 所有。 如有侵权,请联系删除。
联系邮箱: GenshinTimeStamp@outlook.com
本文标题:《 SpringBoot Zero 笔记 》
本文链接:/spring/springboot/%E9%94%A6%E5%9B%8A/springboot-zero.html